¶ Overview
Workflow nodes control the flow of jobs through a Busby workflow.
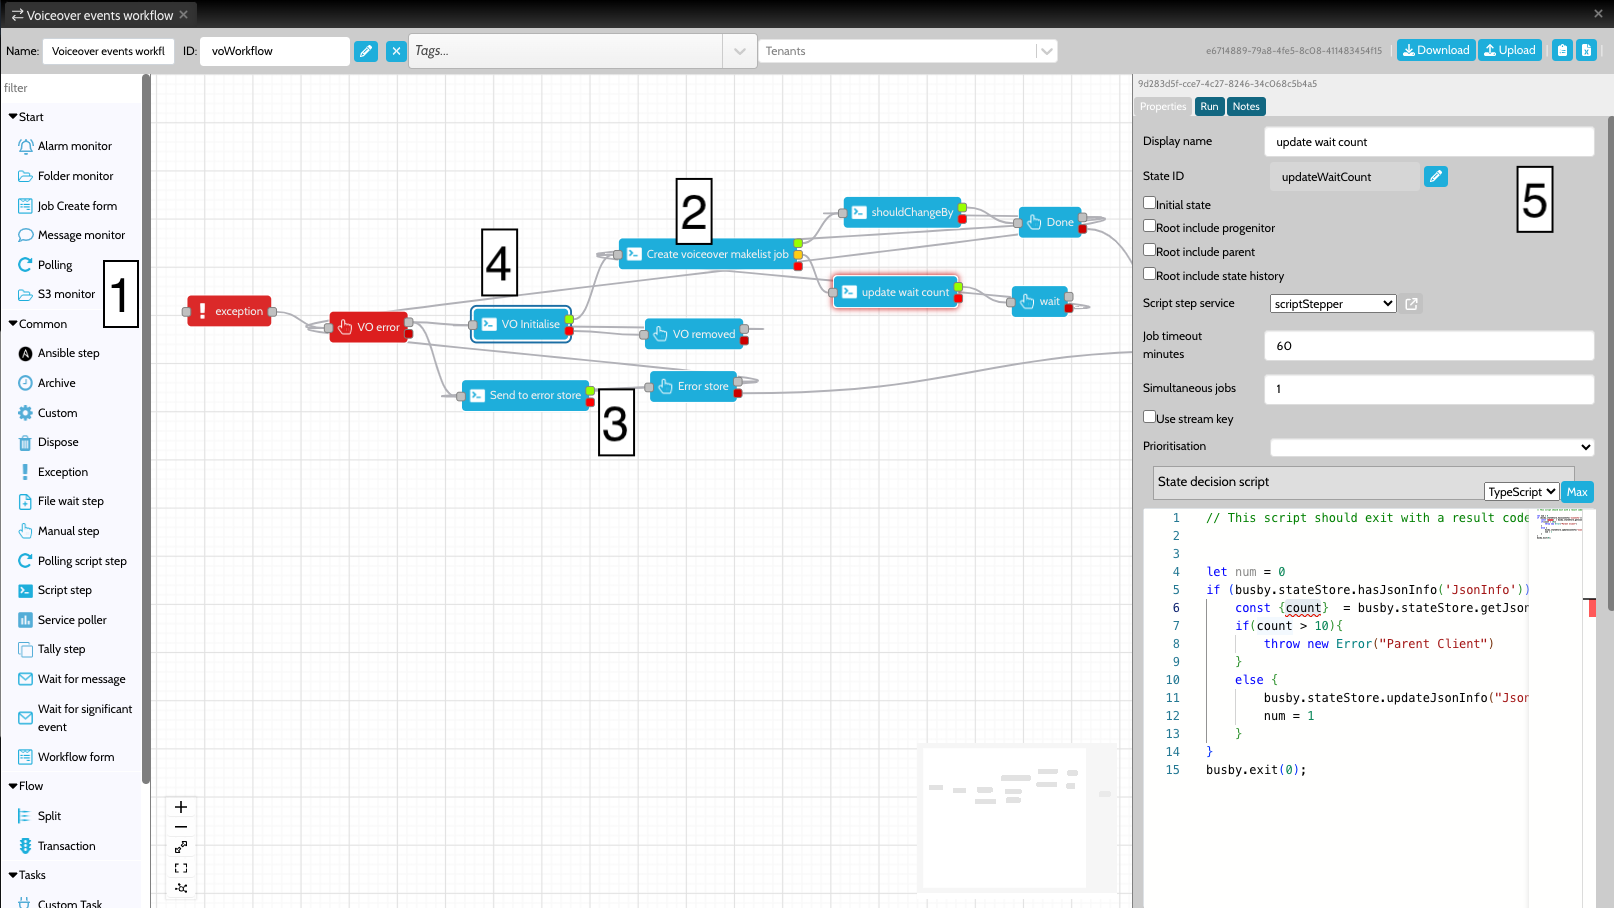
Workflow nodes are accessible from the workflow tab of the configuration editor. To add a node, drag it from the list of node [1] and drop it into the workflow view [2]. Nodes can be connected by dragging from the tags connected to each node [3]. Some nodes allow multiple tags to be added. The extra tags allow a job to follow one of many different exit states.
One node must be set as the initial state of a workflow [4] - this node is shown with a double border.
To get more information about a particular node double click it to bring up the details view [5]. Different types of nodes will show different information in the details view.
¶ Script service
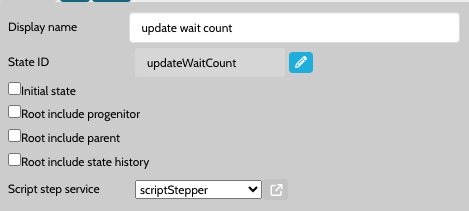
Many nodes run scripts, these scripts are run by a configured microservice known as the Script Step Service, choose or create a script step service with the drop down similar to below.
This script stepper service should then be configured to run on a host or hosts.
Make sure Script Step Services are connected to a node, and then are running on a host. If not the workflow step won't run.!
¶ Outputs
When running scripts they often allow you to define multiple different output tags. These tags can be modified using the Outputs sections of the details area. Normally result codes are numbers, and are accessed through running busby.exit(EXIT_CODE) - so for example in the case below calling busby.exit(1) would exit the corresponding script through the black tag.

There are some special result codes, such as killed and timeout that can also appear in the drop down.
¶ Nodes
¶ Creating jobs
New jobs are created using start workflow nodes. There are 6 types of node that may be used. Jobs may also be created programatically from within another workflow.
¶ Start workflow nodes

¶ Alarm monitor
Notes on the alram monitor can be found here
¶ Folder monitor
Notes on folder monitors can be found here
¶ Job create form
Notes on the Job create form can be found here

¶ Message monitor
Notes on the Message monitor can be found here
¶ Polling
Notes on Polling can be found here
¶ S3 Monitor
Notes on the S3 Monitor can be found here
¶ Common workflow nodes
¶ Ansible
Ansible nodes are used to run an ansible playbook script. The ansible playbook can be used to control and configure one or more devices or services. For example setting up an AWS resource, changing a hostname, copying files to devices and much more which can be achieved with this workflow step.
Notes on the Ansible step node can be found here
¶ Archive
Archive nodes are used as end points in a workflow. They are not stored in the state store service cache, but can be queried directly from the database. You should never include an Archive node on any boards, since it is likely that there will be a large number of jobs in this state.
Also see Dispose nodes if you want the job to be removed completely from the state store database.
Notes on the Archive step node can be found here
¶ Custom
A custom node allows customer specific steppers to be used.
Notes on the Custom nodes can be found here
¶ Dispose
Dispose nodes are used as end points in a workflow. As jobs enters the dispose state they are deleted and removed from the state store cache.
Notes on the Dispose node can be found here
¶ Exception
Notes on the Exception step node can be found here
The exception node provides a mechanism to handle unknown conditions. They are the only state where it is possible to move into where you don't need to join the lines in the configuration editor. When an exception node is entered a script is run, which can be used to carry out error behaviour, such as sending a failure email etc. The exception node is a queued node.
If an exception is thrown from within an exception state it is ignored.
// This script should exit with a result code that then gets mapped to the next state in the diagram
busby.exit(0)
There are three ways of transitioning into an exception node, as the default exception, as a linked exception and as a named exception.
¶ Default exception
If an JavaScript exception is thrown and there is nothing else to catch it, the default exception node will be called. This can happen by calling throw new Error("my new error"), or if an unexpected error happens. Select the Default exception checkbox to set the exception as the Default exception.
¶ Linked exception
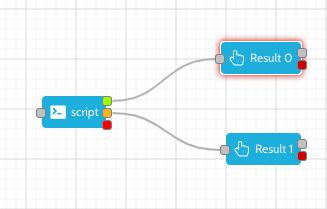
From a script step it is possible to link to a particular exception, as opposed to using the default exception. This is useful if there is particular error handling that is required for a certain step. To do this link the killed tag of the previous step to an exception node.
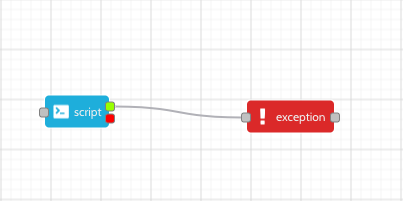
In this diagram the red tag of the script step is given the killed result code. Any exception in the script step will now go to the linked exception handler.
¶ Named exception
It is possible to set up multiple named exceptions, this is useful in a workflow where there are a number of different error handling conditions that might be used within a single workflow. For example it might be that some errors need to inform an engineering team, whereas others might need to inform an operational team. To cater for this it is possible to throw a named exception.
To do this use the busby.exception.throw call. This call asks for an error message, and then the name of an exception state to jump to. In the following snippet, the job would jump to the operational exception state.
busby.exception.throw("Something went wrong", "operational exception")
¶ File wait step
Notes on the File wait step node can be found here
The File wait step node provides a mechanism for a workflow to wait until a file exists at a particular file path or location. Only when the file exists will the File wait node transition to the next step.
In general this is controlled by two scripts, the File wait script and the State decision script. The File wait script is used to determine what file is being waited for, the state decision script determines what to do once a matching file has arrived.
The script to run when the waited for file has arrived.
// This script should exit with a result code that then gets mapped to the next state in the diagram

busby.exit(0)
Script that is run to return the name of the file to wait for.
// Return a string containing the full path and filename of a file (can contain globs https://en.wikipedia.org/wiki/Glob_(programming)).
// At the point this file exists the step calls the stateDecisionScript to move on to the next state
return '/file/is/here.txt'
¶ File wait script
The File wait script should return a string which specifies the filename that is being waited for. Usually this script uses some metadata from the incoming job,
so for example the following script uses a job's internal reference as the filename.
return path.format({
    dir: '/mnt/myfolder/',
    name: root.job.internalRef,
    ext: '.mxf'
});
In this example the node path library is used, this is automatically included in Busby scripts. However as long as the script returns the correct string it can be made however it is most convenient.
It is also possible to use {% include {{site.includes.link}} url="https://en.wikipedia.org/wiki/Glob_(programming)" title="glob" %} based matching, which makes it possible to match files that match a pattern rather than match exactly. The following script will match any files that start with the job's internal reference.
return path.format({
    dir: '/mnt/myfolder/',
    name: root.job.internalRef + '*',
    ext: '.mxf'
});
Instead of using a fixed path, a path derived from a location can be used. This approach allows the directory to be different depending on the deployment and/or the host that is currently set. In the example below a folder location called mylocation has been configured, and it is then referenced through the call to the busby.locations object.
return path.format({
    dir: busby.locations.mylocation.mount,
    name: root.job.internalRef,
    ext: '.mxf'
})
When the service is checking for the incoming file, it waits for the file size to settle so that only complete files trigger the state decision script. Also zero size files are ignored, these are often created as placeholders by transfer systems that don't know the file size until the end of a write.
¶ State decision script
In general the state decision script works in the same way as for a script step node. The only difference is that the root object has an additional property called file, this property contains an object with name and path fields. This can be used to retrieve the exact name of the file that was monitored, which is particularly useful when using glob matching in the file wait script.
The following script snippet shows how to use the extension of the arrived file to decide which workflow state for the job to move onto next.
if (path.extname(root.file.name) === '.mxf') {
    // handle mxf files
    busby.exit(0);
} else {
    // handle other files
    busby.exit(1);
}
¶ Manual
Notes on the Manual node can be found here
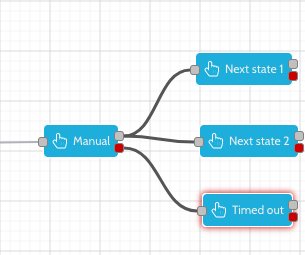
A manual node is used for states that require manual intervention to exit. It is also possible to use a manual node as a temporary state, where the job will timeout after a configured time.
The following configuration shows how a manual node may be connected to multiple 'next states'. These are states that users who have the appropriate privileges are allowed to drag a job into. The second tag on the manual node is used when the job has timed out.
¶ State change forms
When dragging out of manual states it is possible to show the user a form which they have to fill out, which will then add an info block to the job. The form shown is dependent on the state being dragged in to.
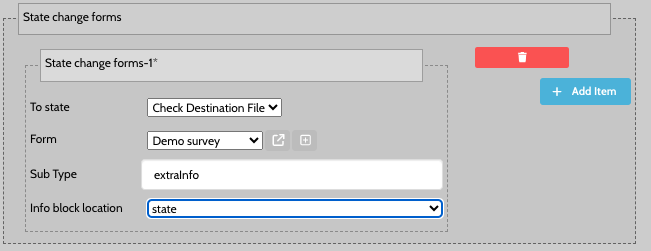
The Info block location determines whether this info block should be added as a job info instance or a state info instance.
¶ Polling script step
Notes on the Polling script step node can be found here.
The polling script node runs a script on a defined interval. The node will exit if busby.exit is called, or it reaches a maximum polls count, otherwise it will remain polling.
It is preferable to use a polling script node that calls a short running script on a regular basis, rather than run a long running script step. Using a long running script step if there are many jobs to poll can be very processor intensive and should be avoided.
The script to run on each poll.
/***
This script will run every x seconds (as defined in the polling interval configuration for this step)

This script should exit with a result code that then gets mapped to the next state in the diagram busby.exit(0)

***/

busby.exit(0);
The following script shows a simple use case of the polling script node. In this case on every poll an external busby service is called to find out if a particular object exists. If it does the job moves on to the next state, otherwise it will wait for the next poll around and try again. Note do not include a busby.exit on the case that the job should remain in the polling state.
const materialExists = busby.call("mam", "hasMaterial", {
    id: root.job.externalRef
})

if (materialExists) {
    busby.exit(0);
}
¶ Script step
Notes on the Script step node can be found here
The script node is used to run generic busby scripts. In general it is expected that these scripts should be short-running - seconds not minutes. However, if this is not the case consider using the Polling script node, or waiting for an event such as the File wait step, or the Wait for message step. The output of a script node is determined by the exit code given in the busby.exit call.
Details of the general scripting process in busby can found here.
The following is a simple example of the sort of logic that can go into a script.
if (_.startsWith(root.job.internalRef, 'ABC') {
    busby.exit(0);
} else {
    busby.exit(1);
}
This script was included in the workflow diagram in the following way.
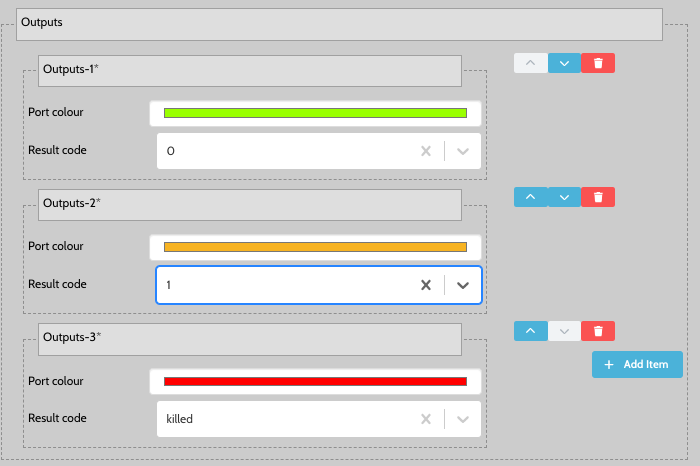
The result codes were set on the script step to add two valid result codes, and one 'killed' result code. The result code values of 0 and 1, need to match the value passed to the busby.exit function.
It is possible to add extra result codes, and these will make new tags appear on the script step node, which can be connected to other nodes. An exit tag of a script step is only allowed to go to one other node. If no exit tag is defined and busby.exit is called for that result code, the job will remain in the current state.
¶ The root object
When a state decision script is run it is passed a root object that contains a number of useful objects
| Property | Description | Type |
|---|---|---|
| job | The job that this script is running on. | Job |
| parent | The parent of the current job. This property is only included if the root include parent option is checked. | Job |
| progenitor | The ultimate parent of jobs going up the ancestory. That is the current job's parent's, parent's, ... until a job no longer has a parent - and that job is the progenitor. This property is only included if the root include progenitor option is checked. | Job |
| history | The state history of this job. This property is only included if the root include history option is checked. | StateHistory |
¶ Handling errors
If a script throws an exception, it will either go to the state of the linked killed tag, or if this does not exist go to the default exception. If neither of these exists the job will remain in the current state.
Errors can either be thrown by using the standard JavaScript approach, or if there is an underlying error (eg null pointer, or divide by zero), or by calling busby.exception.
if (err) {
    throw new Error("Something went wrong");
}
¶ Service poller
Notes on the Service poller node can be found here
service poller
¶ Split
Notes on the Split node can be found here
The split node is used to split a job into one or more child jobs. These then run in parallel as independent sub workflows.
An example of when to use the Split step would be when a workflow ingests a video file for transcoding. The video file parent job would be split into several transcode paths that all run in parallel. When the transcoding of the video has completed on all the separate paths then the split step merges them back into the parent job which continues on to the next step.
¶ Using the Split node
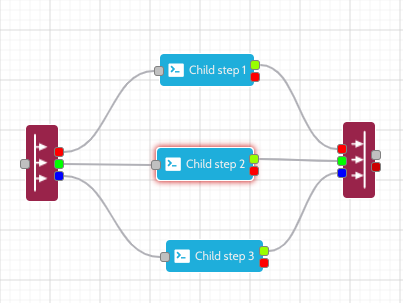
When the Split node is dragged onto the workflow canvas, two nodes are created: split and merge.
Up to 12 child workflows can be defined in the Split step, each of which is assigned a unique colour. The colour can be seen on the in and out ports of the split and merge steps. A coloured dashed border will surround any states that are added to the child workflows. It is important that each child workflow should be linked from the starting split port colour and terminated at the same coloured port on the merge node.
When a parent job enters the split state, a child job will be created in each child workflow. The parent job will then move into the merge step where it will remain until all the child jobs have been completed in the sub workflows.
Each child workflow has three hidden states - complete, exception, and archive. Although hidden in the split step they can be displayed in a workflow board. For a job to be considered as completed, it must have reached either the complete or exception state.
The complete state is inserted after the last node in any child workflow. For a child job to reach this state it must exit the last state in the child workflow. Each child workflows also has a default exception step which will contain any jobs that have thrown an unhandled exception in their progress through the Split node.
Once all the child jobs have reached the completed or exception state, then they will be moved into the Archive state. It is at this point that the parent job will continue on to the next step. If none of the children have thrown exceptions then the parent job will continue out of the grey success port on the merge step. However, if one or more of the children have thrown exceptions then the parent job will be moved into the default exception state for the parent workflow.
Exceptions from each of the children are combined and logged in the state history info block of the parent job. These are displayed in the State History of the parent job in the workflow board.
NOTE: There is a dedicated Busby State Store to mange split and merge operaions. The Split and Merge Service must be running when using the split workflow node.
¶ Tally
Notes on the Tally node can be found here
A tally step is used when the control of moving the job is handled by an external service. It is not possible to manually move out of a tally step.
¶ Wait for message
Notes on the Wait for message node can be found here
Wait for a specific message to arrive before moving to the next state
¶ Message to wait for script
// Call busby.result(json) with a json object that is equal to or a subset of the incoming significant event
busby.result({"fileArrived":"xyz.mxf"});
busby.exit(0)
¶ State decision script
/***

This script runs each time a message is received from the significant event service. The script
should either exit with one of the configured exit codes, or with a busby.ExitCodes.REMAIN_IN_STATE.

The script is passed in an object called root with the following properties

-- root.job - the job that is waiting for the message
-- root.message - the message that is being tested

***/

const job = busby.stateStore.getJob(root.message.params.jobUuid);

if (job.internalRef === root.job.internalRef) {
busby.exit(0)
} else {
busby.exit(busby.ExitCodes.REMAIN_IN_STATE);
}
¶ Wait for significant event
Notes on the Wait for significant event node can be found here
¶ Message to wait for script
// Call busby.result(json) with a json object that is equal to or a subset of the incoming significant event
busby.result({"fileArrived":"xyz.mxf"});
busby.exit(0)
¶ State decision script
/***

This script runs each time a message is received from the significant event service. The script
should either exit with one of the configured exit codes, or with a busby.ExitCodes.REMAIN_IN_STATE.

The script is passed in an object called root with the following properties

-- root.job - the job that is waiting for the message
-- root.message - the message that is being tested

***/

const job = busby.stateStore.getJob(root.message.params.jobUuid);

if (job.internalRef === root.job.internalRef) {
    busby.exit(0)
} else {
    busby.exit(busby.ExitCodes.REMAIN_IN_STATE);
}
¶ Workflow Form
Notes on the Wait for significant event node can be found here
Link to a custom form that will add metadata to this job.