¶ What is a Busby workflow?
Busby comes bundled with a high level workflow engine. This engine provides the ability for workflow jobs to move from one workflow state to another. Jobs can be anything, such as reference to a video file, a playout schedule, a purchase order - or any other trackable entity.
Generally, it is helpful to think of jobs moving through the workflow, from a beginning state to a terminal state. As such workflows in Busby can also be thought of as a work in progress tracker. There can be many independent workflows configured on a single Busby system.
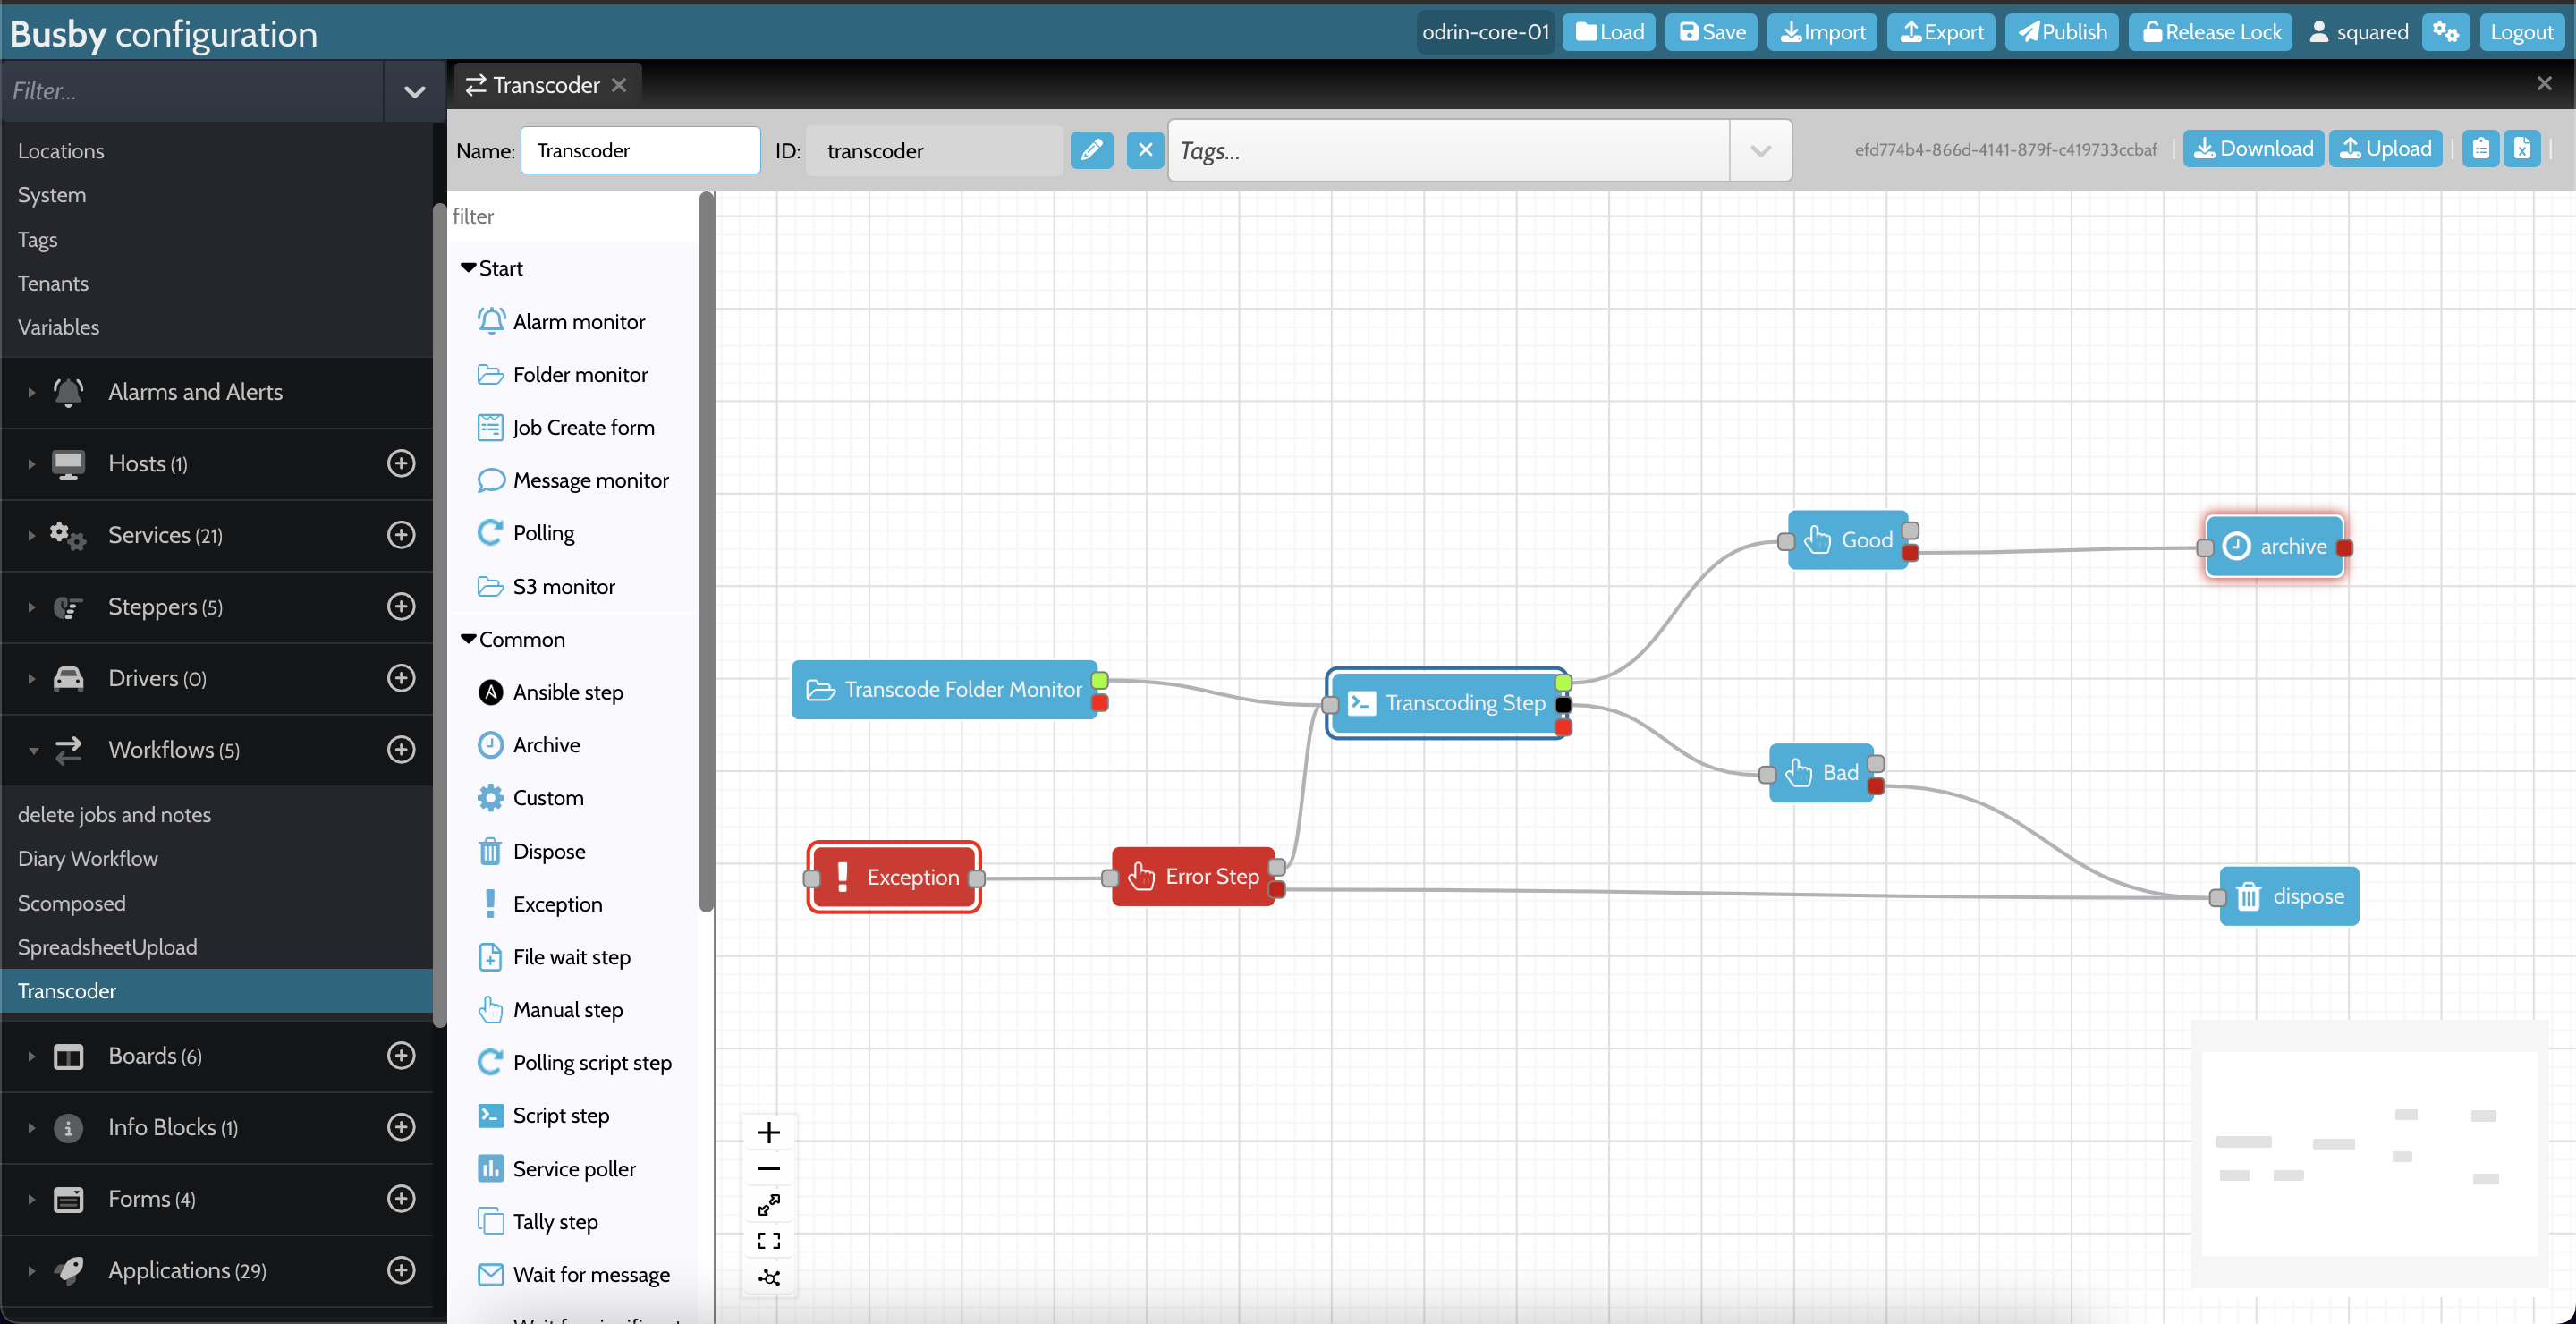
Creating a workflow involves configuring the individual states in the workflow and then connecting valid steps between the states.
¶ Workflow states
When designing workflows it is important to work out what level of granularity to put where. Different workflow systems view their states in different ways. Some see each state as an individual operation that is applied to a job, for example a state might be an if statement, or an individual call to a web service.
Busby views states as a higher level entity than this, more at the business level. So a state would refer more to a job being ready or in transcode or so forth. This means that workflow diagrams in Busby are easily understood and do not overwhelm the user with unnecessary details.
¶ Manual and automatic steps
Each state of the workflow is associated with a mechanism that is used to step from this state to the next. A state defines where a job is in a workflow, and a stepper is the process used to move from state to state. There are a number of steppers that provide different ways to perform each step. Each step can be manual or automatic.
¶ Manual steps
Manual steps are ones where a user can move a job on by hand, usually using a Board, by dragging from one state to another. Note it is only possible to drag between states that have been joined in the workflow.
¶ Automatic steps
Automatic steps are ones that are carried out by an automated process. These processes are known as steppers. Busby comes bundled with a number of steppers, such as the following
- wait for a file to arrive
- run a script
- trigger every n seconds
These automatic steppers can either be specific pieces of software, or written as custom scripts using JavaScript or TypeScript.
¶ Queued states
When an automatic stepper is put onto the workflow diagram, two states are made.
One is for queued jobs that are waiting for a resource to complete the step and the other is for the active state, when the step is actually taking place.
¶ Viewing a workflow
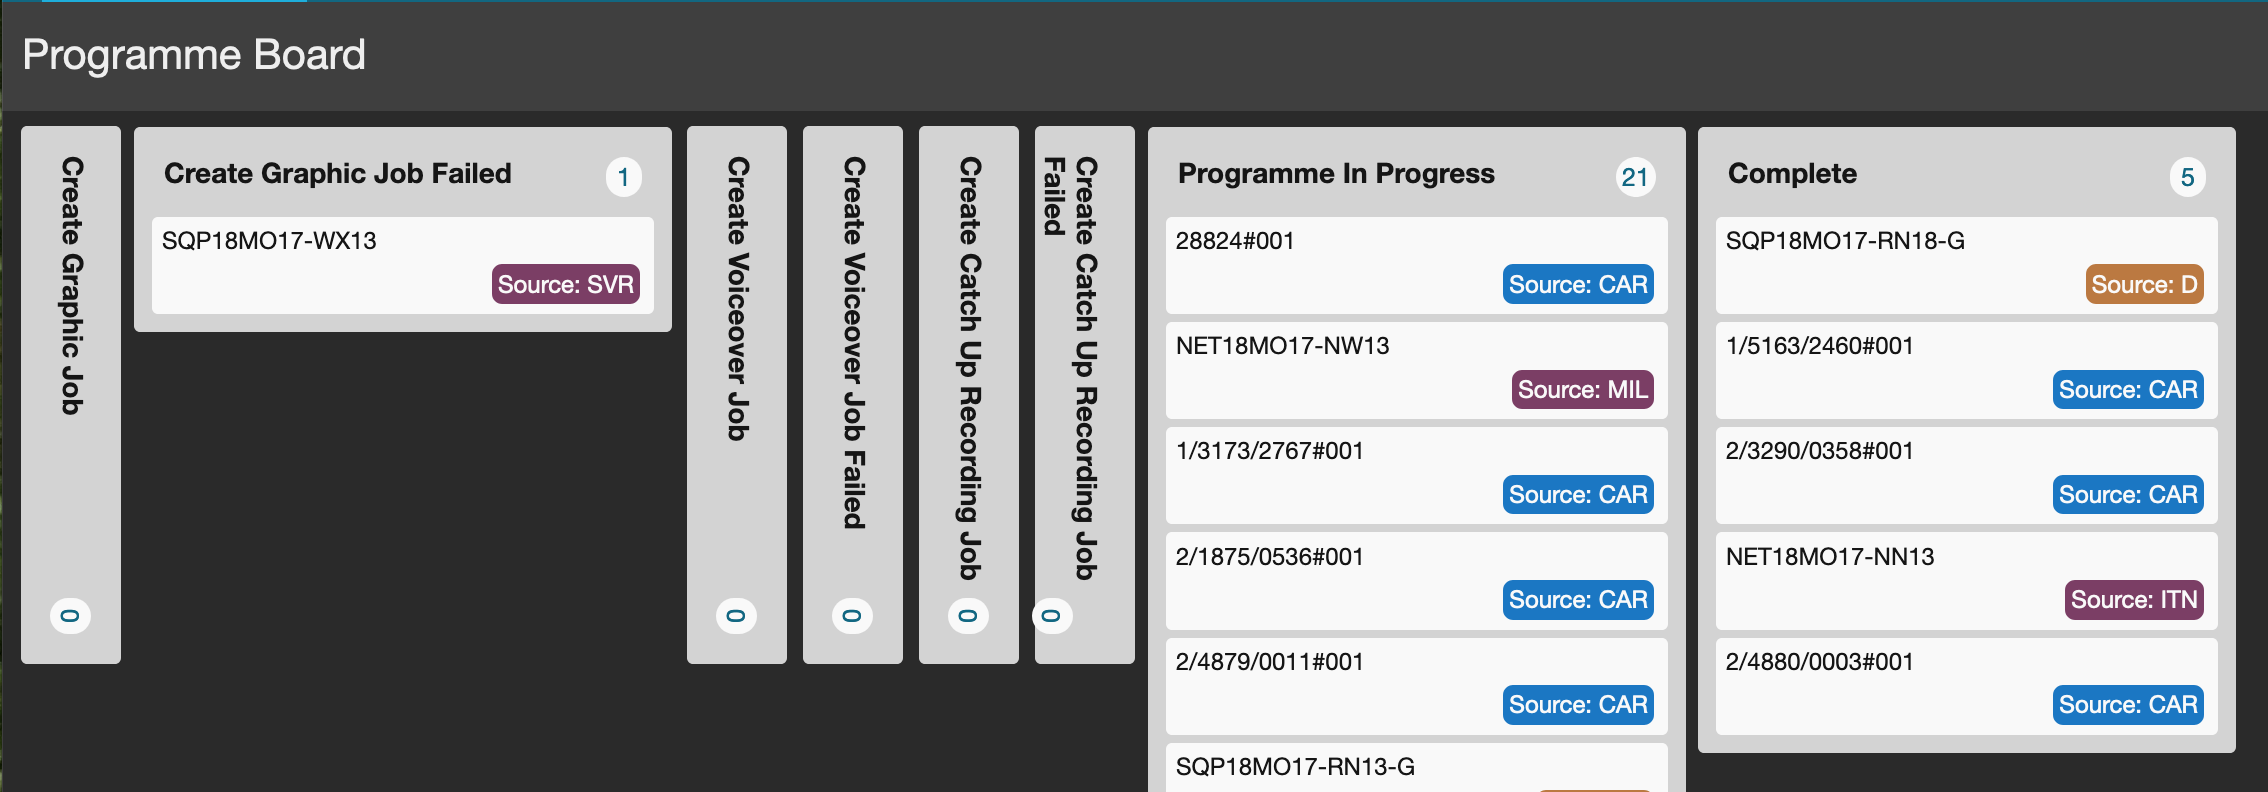
Workflows are viewed on workflow boards. Each board can display multiple jobs in a vertical strip and these strips can show jobs in one or more states. This makes it possible to view the same job at different levels of detail.
Users can be given different permissions on each board, such as view, edit, transition or reprioritise.
¶ Creating jobs
There are a number of different ways to create jobs in a workflow, depending on your requirements. The following are some common ways of adding a job to a workflow.
- Entering details into a form
- Monitoring a folder for a file to arrive
- At regular intervals
- Using a web service
When creating a job in a workflow it always starts in the initial state and then moves through the workflow using the configured steppers.
¶ Info blocks
¶ On Jobs
In order for a job to be useful they often need metadata to be attached to them, this is done by attaching an info block to a job.
Each Info block is defined as a triple, three separate pieces of data - info type, sub type and data.
| Info Type | Sub Type | Data |
|---|---|---|
| One of a collection of possible types, (eg JSON, file, ...) | What this info type describes (eg QC file, delivery details, ...) | The actual data to be stored. The structure of this data will be dependent on the info type defined. |
Info types are generally hard-coded into the Busby system, sub types define the name of this particular instance of metadata.
The following screenshot shows a job with nine different info blocks added to it, each tab is a separate subType, the different icons represent different info types. In this case we are looking at the graphicData subType of an info block with infoType survey, this is an info type that allows for form based entry and viewing of metadata.
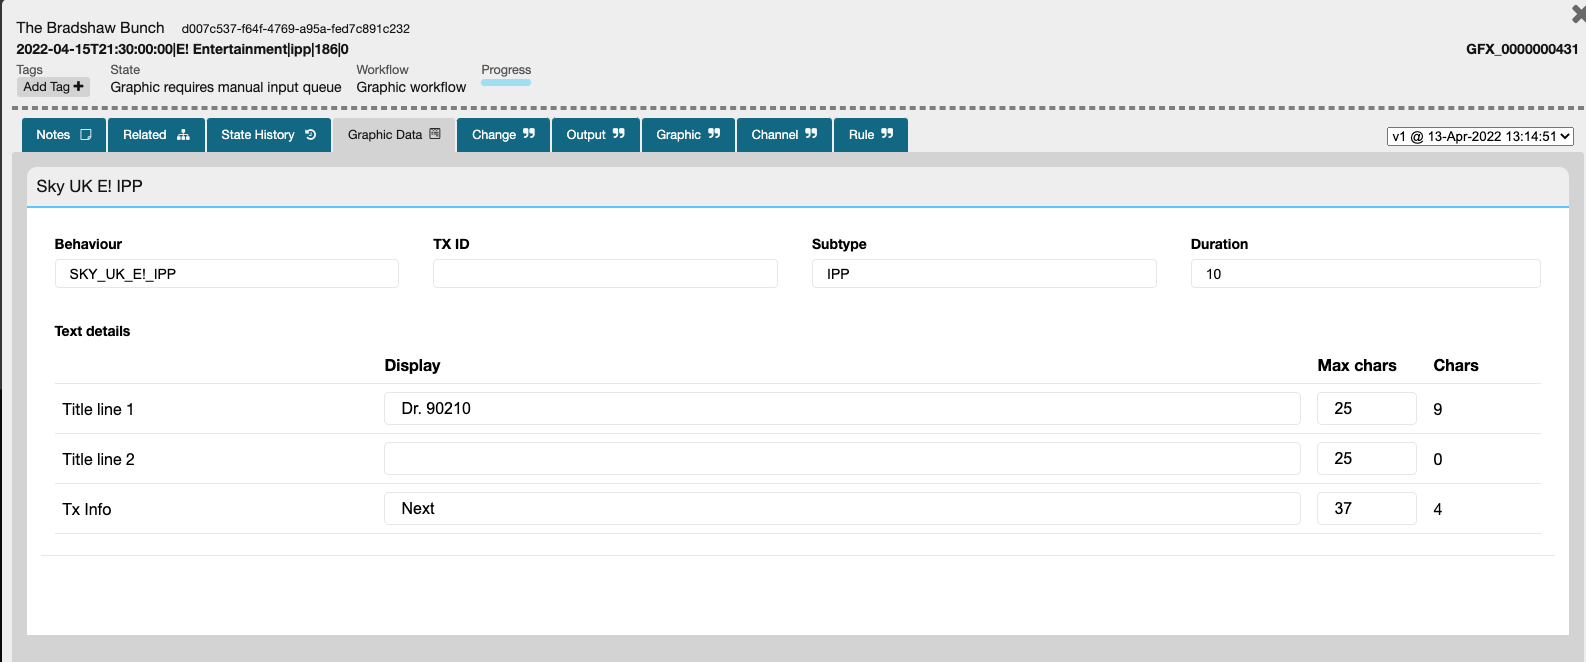
It is possible to have multiple info blocks of the same info type as long as they don't have the same sub type.
As each job proceeds through a workflow they can have multiple info blocks attached to them. Any added info blocks can be read at a later step and all changes made to the info block are versioned.
¶ On State Change
As well as attaching info blocks to jobs, it is also possible to attach info blocks to state transitions. This for example can be useful to store data that might only be appropriate on that state change, such as error info.
¶ Versions
When a new info block is added to a job it creates a new version. All versions are tracked, and can be accessed from the job dialog box. When querying a job the latest version is returned unless this is explicitly not wanted.
¶ Child jobs and linked jobs
A job can be created as the child of one other job and a parent job can have multiple children. When retrieving a job it is sometimes desirable to retrieve its children, parent and progenitor, where the progenitor is defined as the ultimate ancestor of the job.
A job can also be linked to other jobs. Again, links are defined as a triple - linked job type, type and data
| Linked job | Type | Data |
|---|---|---|
| The job the link is going to | The descriptive name of this type of link | Optional metadata associated with the link |
When retrieving a job it is possible to get any associated linked jobs as well.
¶ Job metadata
A job has a number of fields that are used frequently:
- Internal ref - a user friendly unique name that is used to keep track of this job.
- External ref - a reference used by an external system to this job. If there are multiple external systems all referring to this job then an info block should be used.
- UUID - a system identifier for this job
- Description - descriptive text for this job
- Priority - a value between 0 and 1 that defines how urgent this job is. 0 is less urgent, and 1 is more urgent. There are mechanisms for turning this value into a date, to provide time based priority. The priority is used by certain worklow steps to determine what job to process next.
- Should change by - when a job should have completed the processing in the current state. If it has not completed by this time it will follow the timeout procedure defined on the state the job is currently in.
- Complete by - when the job should have finished all processing, and arrived at one of the end states of the workflow.
¶ Behind the scenes
The service that supports the Busby workflow engine is called the state store. It allows calls to add, edit and query jobs. These jobs are persisted in a Postgres Database.
The DB consists of the following tables:
- JOBS - basic data about the job
- STATE_CHANGE - information about the states a job has been through
- JOB_INFO - info block data, stored as JSON
- STATE_CHANGE_INFO - state change info block data, stored as JSON
¶ Workflow nodes
An index to descriptions the standard Busby workflow tools can be found here