¶ Deployments
Here you can add new deployments to your Busby system. Each core can be set as the master,given a name, hosted on a separate IP address and have its own user and password credentials.
Only one deployment can be set as the master deployment at any time.
To delete a deployment click on the delete button at the end of the row.
Please be careful when changing any deployment settings as this could render you whole Busby installation inoperable.
¶ Locations
Paths to often used locations can be added to the Locations panel. This short location name can be used in scripts or wherever a path is required without inserting the long full path. Types of location can be folder, HTTP, S3, SFTP or sql.

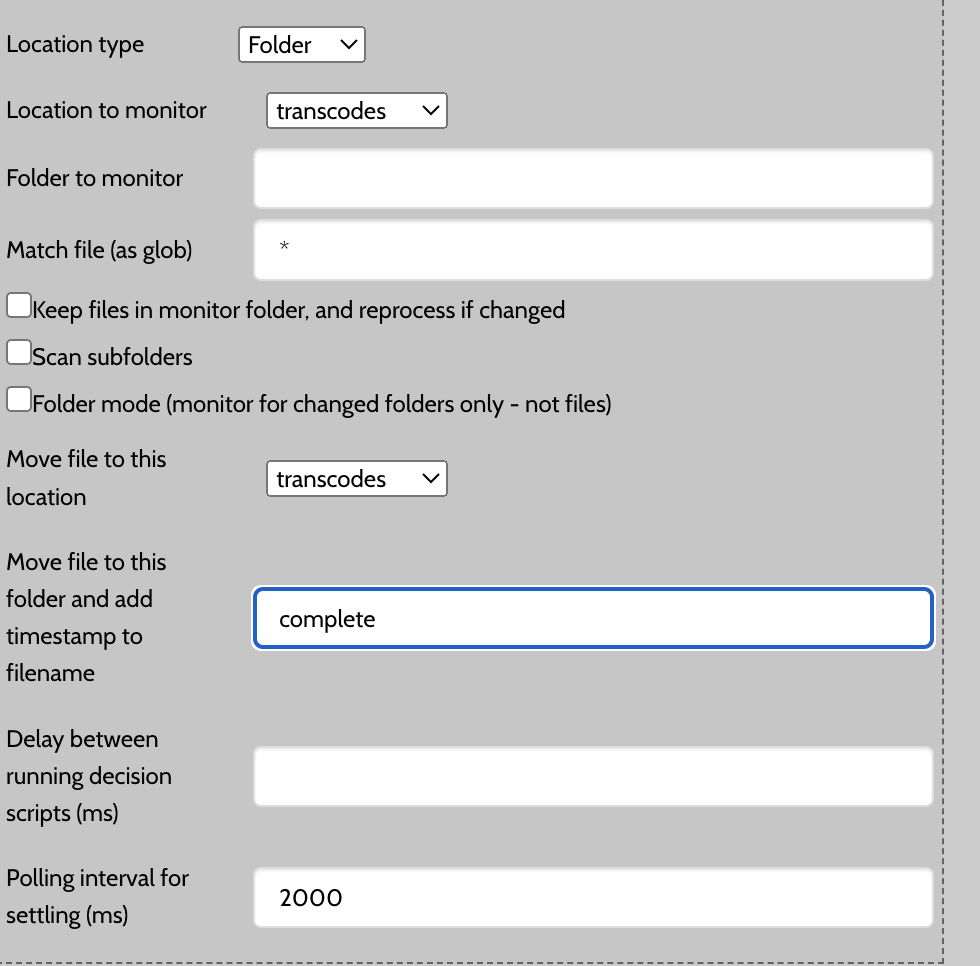
It is easy to add a folder path to locations. First add a short location name, in this case transcode. Select the Deployment and Host from the drop down menus. The Service filed can be left blank. Select Folder in the type drop down menu.
When you have completed entering these details the click on Add Location. The new location is added to a table below.

To enter the full path we need to expand the row to reveal the Mount field.
In the Mount field add the full path to the location, in this case, /home/busby/folderMonitors/transcodes.
Whenever you wish to reference this path just add short location name - transcodes.
¶ System
This panel provides a few system wide settings.
¶ System description
In this panel you can add a brief description of the Busby system. The project name and zone will most likely have been configured during deployment.
¶ ESB Big data logging
Enable this setting to store all busby messages into the big data store. A Big Data service should be configured for this option.
¶ Advanced
¶ Config manipulation service
If a Config manipulation service is configured then when the configuration is loaded for a service the associated script is called. This allows for configuration to be updated by querying 3rd party services at config publish time.
¶ Configuration backup
The Enable remote backup option will automatically push published config to a private site hosted by Squared Paper.
The Enable local backup option will save published config to a configured path as referenced by the host running the config editor service.
¶ Tags
Tags provide a way of filtering services within the config editor. Once a tag has been created, it is possible to associate a service with a tag, and then to filter on the tags you are interested in.
¶ Tenants
The Busby configuration editor provides a mechanism to create multi-tenanted deployments. This means that a service configuration can run independently for each tenant. For example, the state store service can be set up as multi-tenanted, so that different clients are presented with the same workflows, but their data is stored in a different underlying database.

The starting point when creating a tenant is to open the Tenants panel from the System menu. In this panel new tenants can be created by adding a Name and Display name and then clicking Add tenant.
Any of the tenants listed can be assigned to any service, stepper, driver, workflow, application, host or board found in the Busby configuration editor.
¶ Tenants in services
Once a tenant has been created a For the tenants section will be displayed in all the services configuration panels.
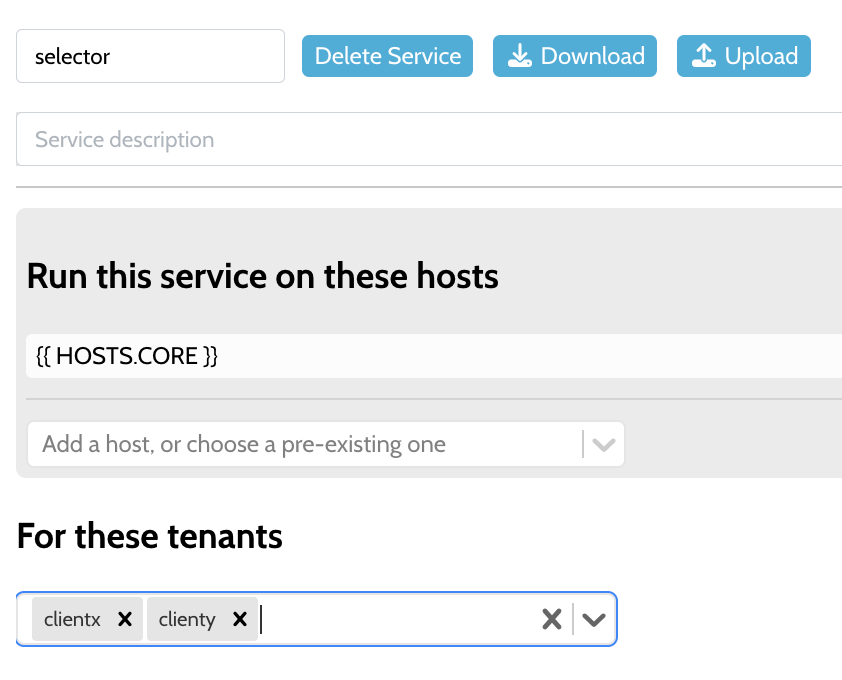
If the Tenants drop down menu is empty then this service will be shared across ALL tenants. This is the default option and it is therefore possible to create new tenants without necessarily assigning them to a service.
Clicking on the drop down menu reveals a list of available tenants. Selection of a tenant will add it to the tenant list and a separate service will be created for it.
The naming of this tenant is as follows:
{lower camel case tenant name}_{lower camel case base service name}
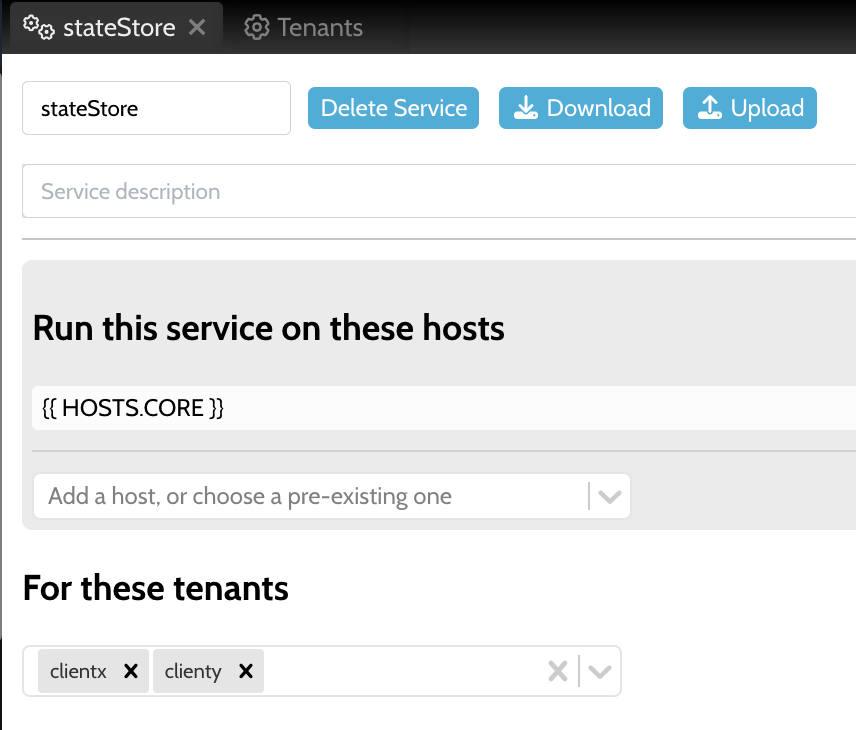
When published two services will be created and will be named clientX_stateStore and clientY_stateStore. There will no longer be a service called stateStore created.
These services will then run on the associated hosts. By default the same hosts will be used for all tenants of a particular service. However using a variable lookup it is possible to run different tenants on different hosts. Take a look at the section on Tenants in variables next to see how this is achieved.
¶ Tenants in variables
Sometimes it is necessary to have a different behaviour or configuration for different tenants. This can be achieved through the use of variables. As before, when a tenant has been added to the tenant list the Variables panel will display a Tenant input text field.
{% include {{site.includes.image}}
src="/busby/assets/configuration/busby_config_system_tenants_tenantVariables.png"
layout="left"
drop="default"
caption-width="40%"
caption="Variables with Tenant input shown"
%}
Variables that have been assigned to a Tenant take precedence over other variable types in Busby. This means if a variable has been configured elsewhere in the configuration - using either {} curly braces or the busby.variables.GROUP.VARIABLE method - the tenant version of the variable is used first. If the tenanted variable does not exist then a non-tenanted variable will be used, only if present.
Combining this variable configuration with {% raw %}{{ HOST.API }}{% endraw %} will run this service on hosts devX1,devX2 for tenant Client X, and to hosts devY1,devY2 for Client Y.
If this variable is used as the host name for a service, then a single configured service can apply to a number of running instances. Some can be used for redundancy, for example, devX1 and devX2 are a redundant pair. While some for multi-tenancy, in this case devX and devY.
{% include {{site.includes.panel-start}} class="reference rounded" width="80%" %}
Note that when there are services that provide persistence in a database,
be careful to ensure that the underlying databases are different.
In particular avoid having two tenants addressing the same database.
{% include {{site.includes.panel-end}} %}
¶ Tenants in workflows
Once the state store service for a system has been allocated to multiple tenants, the associated workflows also need to be attached to the correct tenants. This is done by selecting the appropriate tenants for each workflow in its panel. If a workflow is suitable for all tenants then choose All.
{% include {{site.includes.image}}
src="/busby/assets/configuration/busby_config_system_tenants_workflows.png"
layout="left"
drop="default"
caption-width="60%"
caption="Workflows with tenant drop down menu"
%}
¶ Tenants in boards
Boards can be made available for each tenant by choosing the appropriate values in the tenant drop down menu. Choosing All will make the board available for all tenants.
{% include {{site.includes.image}}
src="/busby/assets/configuration/busby_config_system_tenants_boards.png"
layout="left"
drop="default"
caption-width="60%"
caption="Boards with tenant drop down menu"
%}
¶ Tenants in scripts
When scripts are run in a multi-tenant environment, care has to be taken when calling them from other busby services. Always make sure that any calls between scripts are to the appropriate tenant or shared service.
The rules used are as follows:
-
When calling
busby.stateStore,busby.alarmsor similar the appropriate tenanted service is used. For example if a script was in a workflow for clientX thenbusby.stateStore.getJobwould make a call to the tenants stateStore -clientX_stateStore. -
When calling
busby.callorbusby.sendwith the name of a service then that named service will always be used. For example callingbusby.call("busbyCache", ...)will make a call to the busbyCache service without checking for any tenanted versions. -
Calling
busby.callorbusby.sendwith a service name starting with a$will always call the associated tenanted version. For example callingbusby.call("$diaryService", ...)from a script in the Client X workflow will make a call to the serviceclientX_diaryService.
In general calls should either be made to a shared services or to services within the same tenant. However, this restriction is not baked in to the tenant mechanism.
The Busby configuration editor provides a mechanism to create multi-tenanted deployments. This means that
single service configurations can run independently for each tenant. As an example the state store
service can be set up in a multi-tenanted way so that different clients are presented with the same
workflows, but their data is stored in a different underlying database.
¶ Variables
When doing any configuration within Busby it is possible to use variable replacements, which differ depending on the system being deployed. This means that it is easy to make a single system configuration that can be deployed in multiple different ways. This is useful when setting up test, development and production Busby environments.
Variables can be used anywhere in the configuration, and a replacement is made when the configuration is deployed.
¶ Making a variable
In the configuration tool go to the Variables page. At the top of the page are boxes to enter a new variable.
| Group | Name | Deployment... |
|---|---|---|
| A group name, used to group different variables together | The name of this variable | Multiple columns, one for each deployment. This is the value of the variable for this deployment. |
Note the group and name are always uppercase, the configuration editor will enforce this when adding a variable.
¶ Using a variable
Anywhere within the configuration tool where you have a string, you can enter a variable by using double curly brackets, with the group name followed by the variable name.
{
    "configuration": {
        "title": "my title {% raw %}{{ GROUP.NAME }}{% endraw %}"
    }
}
Note that the variable replacement is literal, so in the above example it is possible to make a replacement directly into the string.
If you want to use a variable as a JSON string remember that it you will need to put in the quote marks { "value": "{{MY.STRING}}"}. Adding a number or boolean does not require quote marks eg { "value": {{MY.NUMBER}}}
¶ Variables in strings
Remember to include the string markers outside of a variable, otherwise the configuration will treat the output as an object and is likely not to work.
¶ Variables in scripts
When using variables in scripts it is possible to use the {% raw %}{{ GROUP.NAME }}{% endraw %} syntax, however when using TypeScript the transpiler does not understand this and will complain. Instead it is better to use busby.variables, this is an object that has all the variables defined within it, so for example if there was a variable HOST.NAME then it can be accessed as busby.variables.HOST.NAME.